Azure Application Gateway | WAF Policy per Listener
With Azure Application Gateway v2 coming, a lot of new features have been added. Much faster deployment and change times, auto-scaling and the ability to assign different Web Application Firewall (WAF) policies per Application Gateway’s listener. This feature provides more control over each listener and also can limit the number of different Application Gateways you need to deploy.
With a custom WAF policy we can control the firewall per listener (URL) with:
- Firewall mode, Prevention – Detection
- Request body properties
- WAF rule set category & version
- Custom Rules with If / Then conditions
- Match IP address, Number, String, Geo location
- Allow / Deny Traffic
This post scenario
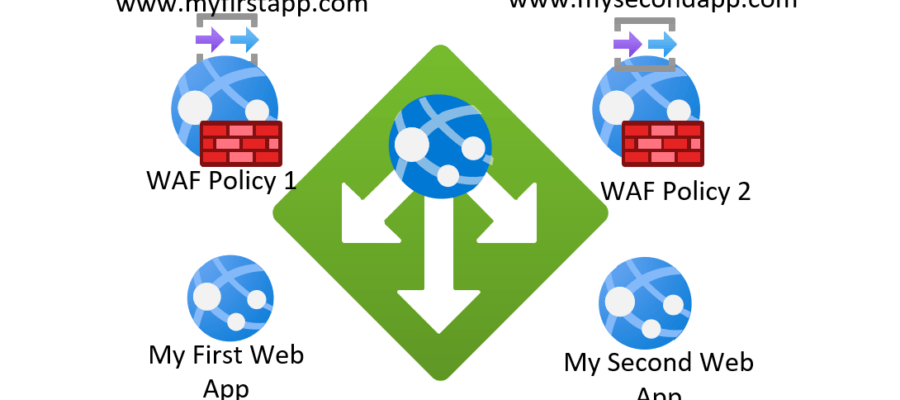
We have on Azure Application Gateway with two Listeners (listens to two different URLs at its Public IP). The two listeners are forwarding the traffic to two different Web Apps, as shown at the below image.
My request is to allow all traffic to the first URL but allow traffic only from a specific IP to the second URL.
For the demo, I assume that you already have an Azure Application Gateway v2 in place and you have published two back ends (web apps, VMs, custom IP) and your web sites / apps are healthy and you can browse them behind the Application Gateway.

Since I am using the default azurewebsites.net domain, I added two hosts at my workstation’s host file, in order to route the traffic to the Application Gateway’s IP and not directly to the Web Apps.

I can browse both Web Apps, through the Application Gateway, from my browser. I am using http and not https for the demo since I am using the default domain and I cannot add a custom certificate.


We need to create two Web Application Firewall policies (WAF). One for each listener. To create a WAF policy, search the Azure Portal for waf and click the “Web Application Firewall policies (WAF)”.

At the “Web Application Firewall policies (WAF)” page click +Add

At the Project details select “Regional WAF (Application Gateway)”.

Select the Subscription that your Application Gateway resides, select Resource Group, add a name for the Policy and the same region as your Application Gateway. The policy must set to Enabled to apply. I named the policy URLNumber02 to start creating the policy for the second URL that I want the custom rule.

At the Policy Settings change the setting to Prevention from Detection and go to the Custom rules and Add custom rule

I named the rule “AllowOnlyOneIP”, since I want to allow only one IP to access the second URL (listener) of the gateway. Give a priority, I added 1 as it is the only one. At the conditions select:
- March Type: IP address
- Operation: Does not contain
- IP address or range: add the only IP that you want to allow access to the URL
At the “Then” condition, select “Deny Traffic”

This rule will allow traffic only of the IP is the IP address that we added to the condition. For all other IPs access will be denied.
Now that we created the policy, we need to assign it to the listener. At the next step of the WAF policy wizard we need to select the Application Gateway and the Listener.

First click the “Associate an application gateway” and select the Application Gateway. Remember that this policy will need to overwrite the default Application Gateway’s WAF policy. So before proceeding migrate your current WAF settings and customizations to the new WAF policy.

After you select the Application Gateway, associate the listener. I associate the “mylistener02” that is my second URL, with this policy.

After saving the policy, go to the Application gateway and check the “Web Application Firewall” settings. There you will see that all settings disappeared and you can only see that the gateway is associated with a WAF policy. We see that it is Associated to the URLNumber2 polily.

You need to create one more WAF rule for URL 01 for the correct functionality. Once you create a WAF policy and associate it to the other listener of the Application gateway, you will see that at the “Web application firewall” is associated to the new policy. Actually the Application gateway is associated to both WAF policies, one at each listener. You just cannot see this at the Azure Portal.

We can see the WAF rules that are associated to the Application Gateway’s Listeners using the PowerShell. Running the “Get-AzApplicationGateway -Name AppGw01 -ResourceGroupName AppGw01” command you can see that the “URLNumber01” WAF policy is associated to the “mylistener” and the “URLNumber2” is associated to the “mylistener02”.

To test the policies, I tried to access both URLs from a computer that don’t have the Public IP that I added tot he policy and I can access the URL 1 app but I cannot access the URL 2 app. From the computer that has the Public IP we added at the rule, I can browse both sites.


The WAF rules can be edited at the Web Application Firewall policies (WAF) blade and all settings will apply to the corresponding listener.


Pantelis Apostolidis is a Cloud Solutions Architect at Microsoft and an ex Microsoft Azure MVP. For the last 15 years, Pantelis has been involved to major cloud projects in Greece and abroad, helping companies to adopt and deploy cloud technologies, driving business value. He is entitled to a lot of Microsoft Expert Certifications, demonstrating his proven experience in delivering high quality solutions. He is an author, blogger and he is acting as a spokesperson for conferences, workshops and webinars. He is also an active member of several communities as a moderator in azureheads.gr and autoexec.gr. Follow him on Twitter @papostolidis.

One comment