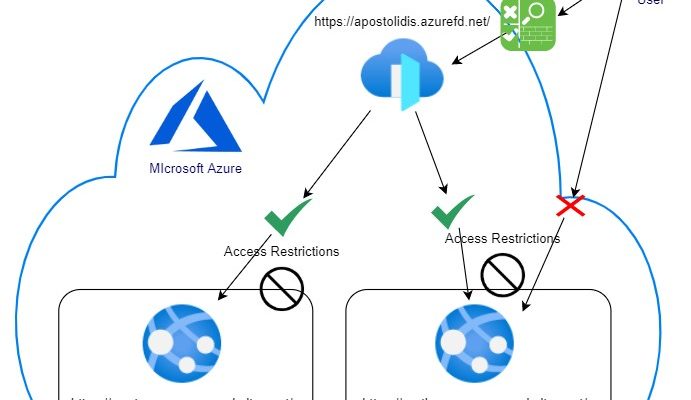
At the previous post we created an Azure Front Door to scale our web apps across Azure Regions and also publish them only through the Front Door’s URL. At this post we will create Web Application Firewall (WAF) rules, to protect our web apps. To add WAF functionality to the Front Door we need first to create WAF rules and then attach them to the Front Door
Create the WAF Rule
From the Azure Marketplace search for WAF and create a Web Application Firewall

At the “Create a WAF policy” wizard select “Global WAF (Front Door) for policy, provide the subscription and resource group, give a name for the policy and select if you want it to be created enabled or disabled.

At the next step select if the policy will prevent the action or just detect and report it. You can change this later too. You can provide a Redirect URL for rules that support redirection. The default status code is 403 but we can change it to e.g. 404. We can also add a custom response body.

The next step is the rule. We can select one or more predefined rule sets and then customize at will.

To customize, expand the rule set and select a rule. You can enable / disable the rule and you can change the action to Allow, Block, Lod or Redirect.

WAF Custom Rule
The next step is the custom rules. There’s a lot to customise here. First are the rule type settings. Select status of the rule, enabled or disabled. Select the Rule type between Match and Rate limit. If you select rate limit you will be prompt to set rate limit and threshold. The final rule tupe setting is to set the priority of the rule.

Next is the Conditions (If this) and the action (then that).
The condition can be Geolocation, IP address, Size or String. After selecting the Match Type the rest options are altered accordingly.

The action can be Allow traffic, Deny traffic, Log traffic only or Redirect traffic

For the demo I created a rule that will Deny all traffic from The Netherlands, because I can test it from an Azure VM located at the West Europe Region.

The next step is to associate the rule to the Front Door. After that assign Tags if needed and create the rule.

Once the Rule is ready, a “Front Door WAF policy” resource will be at the selected Resource Group.

Inside the Front Door, at the Web application firewall section, you can review the assigned rules.

The below diagram shows the current setup. The user cannot access the Azure Web Apps directly, only through the Front Door and the requests are filtered by WAF rules.

Test 1
From an Azure VM at West Europe Region, I tried to access the Front Door’s URL and we can see my custom 403 body text!

Test 2
From my Computer I tested a typical SQL Injection attack from https://www.owasp.org/index.php/Testing_for_SQL_Injection_(OTG-INPVAL-005) . Again my custom 403 page!


Pantelis Apostolidis is a Cloud Solutions Architect at Microsoft and an ex Microsoft Azure MVP. For the last 15 years, Pantelis has been involved to major cloud projects in Greece and abroad, helping companies to adopt and deploy cloud technologies, driving business value. He is entitled to a lot of Microsoft Expert Certifications, demonstrating his proven experience in delivering high quality solutions. He is an author, blogger and he is acting as a spokesperson for conferences, workshops and webinars. He is also an active member of several communities as a moderator in azureheads.gr and autoexec.gr. Follow him on Twitter @papostolidis.

